I have worked on a number of tiles this summer and now is the time to get those ready to hang.
I use a simple d-ring on the back of the 3x6 it works great to make them ready to hang.
I find that most people prefer having something ready to go.
All they will need to do is pick a spot, put in a nail or screw and hang.
I like to let them sit at least 24 hours for the glue and d-ring to set up.
I already have 2 more round of tiles rolled to add to these.
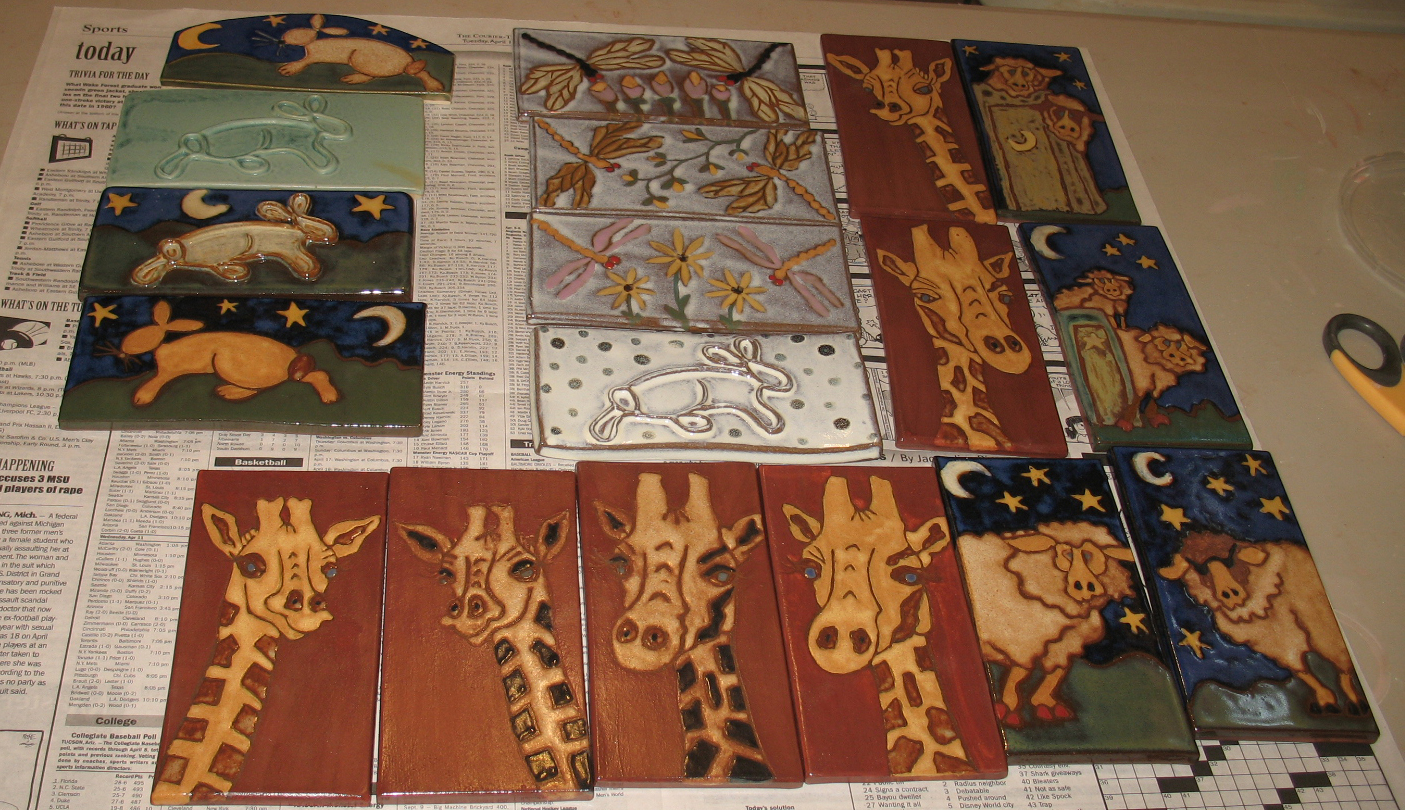
This round has more of the 6x6 and a few larger ones as well.
The hard part is decided what to put on them.
Sometimes I just enjoy letting myself draw all over the tile and go for it.
Other times I hold myself to things I think I need to make.
Here is one of the tiles that I played with last round.
Of, course I see things I might change on the next round.
I have been watching the dragonflies dart all over the pond they are really busy right now.
I have seen many butterflies making their rounds through the yard as well.
I planted some flowers just for them to enjoy, I am watching to see if they lay a few eggs here and there.
Keep your eye out for those sheep, they are always getting out.
Sh, don't tell the farmer......
Stay cool out there, it's hot.
m
Showing posts with label cone 6. Show all posts
Monday, June 18, 2018
Monday, November 13, 2017
The brain and the madness of it all.
When I am working on glazing I have had times that I can not stop a thought. The thoughts of what if I try this or what if I do that. I know you know what I mean, you have to. The other day as I was glazing the last kiln before our show this weekend I needed blinders to keep me in focus. I kept telling my brain don't look over there, stop thinking about the next thing and think about the task at hand.
My brain did not want to listen.
Look, you have room for 3 small tiles that you can do this test on, just do it.
And, so I did.
I grabbed up the 3 small tiles above and drew on them, I then used a black pottery pencil to follow the lines. I then tried one with a glaze on top, it covered too much. I tried the other 2 just as I would my tiles with the black wax on them. I then waxed them and applied a background glaze. I juggled some space in the kiln and in they went. I think there should always be something in the kiln that you want to see, something to get excited about. I was curious to look at these small tiles.
My reaction is that I like them and now cannot wait to put this to the test on some other pieces.
BUT, we have a show this weekend and I have to sit on this until it is over.
Instead we are packing up the booth, packing boxes of pottery and shifting work to the store/gallery for Mark to have plenty of work to sell here.
Those new ideas will have to wait.
Last weekend a long time customer and his wife came in to pick up something for her birthday. She had been in a few weeks back to ask about tiles, they had built a new house and were planning how to display their pottery. I told her to measure the space, cut out some craft paper and tape it up to see what the size is that they would like to have.
She did just that and it made it easy to pick out the work. Later that night I got this great picture of the tiles enjoying the company of another potter's owl lamp. Fun, I like it. I cropped the picture in order to remove a picture of them.
Also on saturday the backsplash was picked up and taken away to be installed. When I get pictures I hope to share.
Cheers!
M
Monday, October 9, 2017
Monday, Monday
Mondays are good days to start on the next load of pots to help fill the kiln. While Mark is busy working on teacups, I am working on a batch of salt jars.
The teacups will go out for an order due in November. The salt jars are heading to our gallery here, and if not sold,we will take them to the show we have coming up in November at the Luck's Bean factory on 705, less than 2 miles from us.
The teacups will be made one with a handle and one without. The thought of the one without is that it needs more ridges in the body to make it easier to hold on to the cup.
Mark makes some tumblers in this style and those ridges feel good in the hand and do make it easier to hold.
I need to get back to work but not before I share a late butterfly with you that was busy visiting the flowers. He or she was so quick I had trouble getting very close.
This is the warmest October that I can remember.
For once I am ready for fall, ready for cooler weather.
It's time.
Monday, July 31, 2017
Firing in July
Adding in thrown pots along with tiles has allowed me to fire quicker. It just makes sense to fill the kiln faster.
This was firing number 3 for July.
My plan is another firing soon.
I need some time to roll more tiles. Maybe that needs to be on my list this week as well.
What's on your list?
This was firing number 3 for July.
My plan is another firing soon.
I need some time to roll more tiles. Maybe that needs to be on my list this week as well.
What's on your list?
Friday, July 14, 2017
Tiles and such
Back it up!
We are working on a glaze that we used a million years ago, well, maybe more.
The black glaze was developed by our son when he was looking for a good science project. What better than to have your parents toss you some glaze materials, a recipe and then show you about doing a line blend.
He measured and tested glazes, did his own firings and this was the result.
He won a trip to DC, we won a glaze.
We set this glaze aside as we were working more in the big gas kiln and I was having a hard time keeping up production on both kilns and our many other glazes. We were also raising kids, running and doing as you do with a family, here, there and everywhere; baseball, girl scouts, boy scouts, band, colorguard, theater,wrestling, life, just life.
Recently we decided to bring back this glaze and add it to the tile firings. A few months of testing, a few firings and we are happy with the results. We did make a slight adjustment to the firing and hold temperature, it all looks good.
I think I will glaze more mugs and make another firing very soon.
Tiles. I am playing with house tiles.
They are fun, a bit slow, require thought, but I love a red door.
more
Whoops, I must have knock over that test tile.
Look Ma! No Hands!
Tuesday, May 23, 2017
A day for planning
It's time to plan a firing for Ms. B,
even though she is a smaller kiln than the old workhorse kiln we had, now retired, we try to keep the same habits we always used. We still feel it saves us time in the long run to know which pots are going in the kiln with a side shelf of extras that are on stand by as fillers for that hole or two, or as a replacement for a glaze gone bad.
We have a board that we marker off back in 1982 for just this job and it still works great.
The new layer to the planning is taking a picture with the camera or phone to look as we are loading to be sure we are getting the pots in the right placement.
The top picture will be the top of the stack. The picture to the right will be used about midway up, 6 inches in height. We also make sure the pots will fit under the height requirement. Learning to make like items makes the work of planning easier.
There is nothing worse than having one pot that is too tall for the shelf to toss off the loading and leave us looking at or for a pot to take it's place. It is also best if you notice that too tall pot before you put the shelf down.
I am working in some red clay right now. These pots will help me fill out the electric kiln when I am glazing and firing tiles. I found that just trying to fill up a kiln with tiles takes too long. We have slowly been adding some thrown pottery to the mix to help move things through at a quicker pace. The idea is to keep these shapes simple, useful items such as mugs, bowls, spoon rest, birdhouses, sugar jars and salt jars. I am sure a few more items will find their places in the mix.
We have fired some pottery with the last two firings of tiles, I am pretty sure that it will make my life a little easier, maybe, I hope, of course, what could possibly go wrong.....
More pictures as things move along.
Cheers!
M
Sunday, March 26, 2017
Keeping your eye on your kiln
This time I asked him to turn it on as I was leaving and make sure we vented the hot wax out of the kiln before dropping the lid. We use hot wax, or paraffin to coat the bottom of the pots before they are glazed. It keeps most of the glaze off the bottoms and what is left can be easily sponged off.
Mark let the wax vent off by leaving the lid and peep holes open after that he closed the lid, closed the peep holes and let it fire. It was going along as it should until it hit 2183 degrees. Our computer program is set up to hit 2190, then cool to 2175ish and hold 15 minutes. He looked and it said, 2183, he went back and it said, 2183. Here is what we did not know, how long it was holding at 2183. He tried to call me at the school, but because I am all over the building I missed his called, he called again, he called again, and finally I heard my cell phone go off. Here is what is going on. My reaction was, shut it off. I knew the glazes would be matured, my hope was that they had not been sitting there at 2183 so long that the glazes had become runny enough to over fire or that we had over fire the clay body.
In the morning, I took a quick look.
Then shut the lid.
Then I slowly let the kiln cool.
560.
500.
480.
400.
350.... I started opening the lid, 325, open more 300 degrees I opened the whole lid and let thing cool to around 200 degrees.
I did lose a few pieces, such as the one at the top of the post, and 2 more that were the same combination.
I lost a few pots to the clay sticking to the top shelf. That was more my own fault for using an older shelf and not applying a fresh coat of kiln wash.
But, all in all the black glaze, with the top glaze that we have been working to salvage for over a year, worked. It melted, stayed on the pots and over all we like the results. Here's what we think happened, the kiln stalled when one of the thermocouples failed. We looked back to find out when we bought this kiln and turns out we bought it almost 8 years ago. So yep, time to do a little maintenance. After which another fire to see if we can replicate the results.
It could have been worse, so much worse, I feel very lucky.
Remember when you are firing that computers can fail, your eyes are the best source to see that your kiln has finished it's job.
Whew.
M
Sunday, December 13, 2009
Tiles and such

Allison's tiles are glazed and just waiting for Mark and me to finish up ours so we can fire.
I have done some of the pillow pots, from the nightgown series.
I was inspired by a nightgown which was hanging in my bathroom.
It is electric blue with these wild flowers all over it.
The flower got stuck in my head and needed to go somewhere.
They decided to come out on tiles and these pots to hang on the wall.
People keep asking what they are for.
I tell them just to look at- they have no use.
I think you need some pots that have no real purpose.
Just to add that splash to a room.
Mark had someone ask that other day and his response was, "to make you happy."
Nice- something to brighten the day.
While I am carving on my tiles Mark has picked up the brushes.
He had planned to carve the tiles below, but after laying down some red slip on the white clay body this is what came out.
How could you not like this?
It made me smile and think of how different we approach the tiles.
Me, I am all over them covering and carving.
I have plans for bright glaze.
Mark he takes his brush and with some well placed strokes......
Well- these tiles should make someone happy.

Allison's.......just waiting

Things move a lot slower here then other months.
A note on the white clay.
Linda Starr, the soon to be traveling potter, living in an RV and getting ready to hit the blue highways and visit potters all over the USA, asked about colors on the two clay bodies.
The glaze colors are completely different.
The iron in the red body adds color to the glazes, where the white body does not interfere with the true color of the glaze.
For different reasons I like both.
I will do some side by sides of the colors after I fire again.
I told you it's December- things slow to a crawl in December.
Visions of sugarplums and all that stuff.
Cheers!
Friday, September 11, 2009
Clear results
I want to thank Mike for his information on the commits page.
From Mike:
"A year or so ago I wrote a free website to allow people to store recipes and calculate the unity formula for your glazes. The site is http://www.glazecalculator.com/.Also, you can post your recipes. Here is the info on the glaze you posted as an example:http://http://www.glazecalculator.com/"
If you have not taken a look do so.
Not much here but the results.
The winner to date- Ron Myers.
The younger Kate cone 6
This is the shiny White out of an old ceramics monthly- 1982
Time to check the garden, fix some food and later check out the night sky and the
moon flowers!
Subscribe to:
Posts (Atom)